Piping Technology & Products’ constant spring hanger, usually referred to as a constant, provides constant support force for pipes and equipment subjected to vertical movement due to thermal expansion at locations where maintaining a constant stress is critical. This constant resistance is achieved by having two-moment arms pivoted about a common point. The load is suspended from one of these arms, and a spring is attached to the other. With an appropriate choice of moment arms and spring properties, a resisting force can be provided that is nearly independent of position. As with variable springs, Type refers to the connection of the constant to the structure and the pipe. Figure 4 shows the attachment for Types A – E. The designation Figure 100 and 200 refer to the orientation of the spring can. This is vertical for Figure 100, and horizontal for Figure 200.
Travel stops are installed in all constants before shipping. These must be present during installation and any hydro testing, but must be removed before normal operations. They are usually pins, but in some cases may be keys. See note below on travel key removal. In either case, the load must be adjusted so that the travel stop is easily removed.
Caution: Do not force the travel stops.

Figure 4: Constant Hangers Types A – E.
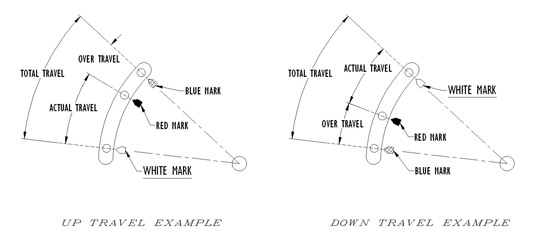
Red, White and Blue Marks:
All constants are shipped with at least 3 color-coded rivets (red, white and blue).
Red: operating (HOT) position
White: installation (COLD) position
Blue: over travel (MAX AVAILABLE) position
Below are sketches of one direction vertical travel:
Below is a sketch of dual direction vertical travel: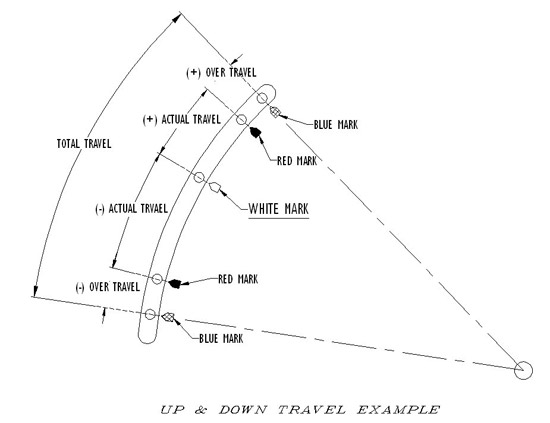
Types A – E Constants (100 & 200)
Figure 5: Travel stop position.
1. Secure the hanger to a structure capable of handling the operating load, at a point where the constant’s load coupling is directly over the desired point of attachment to the pipe in the operating position.
2. The hanger rod and loading arm of the constant should be unobstructed.
3. Attach the connecting rod to the turnbuckle with full thread engagement.
4. Transfer the load by turning on the turnbuckle before removing the travel stop.
5. If required, hydro testing should be done at this time.
6. Once the load is transferred, the travel stop must be removed. The travel stop (painted red) should now slip out easily. If not, refer to Figure 5. The travel stop pin must be moved to the center of its hole by adjusting the hanger load. The hanger load needs to be increased if the pin is in position A, or decreased if the pin is in position C. Once disengaged, the travel stop may be stored by hanging it from the constant.
7. The hanger load should now be readjusted to the cold (white mark) position.
8. When the operating conditions are reached, check the hanger to assure the indicator is at the hot (red mark) position.
Type F – 100 Constants
1. Secure base plate to the structure.
2. If the constant is of the platform type (see Fig. 6), place the pipe on the platform, and attach it to the platform. If there is no platform, attach a strut to the piping, then to the constant support.
3. Hydro test line if necessary.
4. The travel stop should be in the middle of its hole. If the travel stop is in the A- configuration (see Fig. 5), contract the strut, and if it is in the C- configuration, expand the strut to force the travel stop pin to move to the center of the travel stop hole. When the travel stop pin is centered in the travel stop holes, it can be easily removed and the constant is ready for operation.
Danger!! If pin cannot be easily removed after struts adjustment, do not drive pin out.
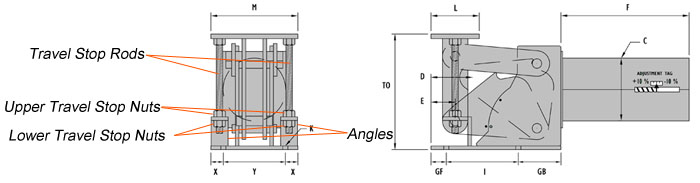
Type 200 – F
The Type 200 – F constants are shipped with two installation rods.
1. Attach the base plate of the constant to the supporting structure by placing the constant in its installation location. If the clearance is tight, temporarily force the table down by loosening the 2 travel stop nuts on top of the angles, then tightening the nuts below.
2. Loosen the travel stop nuts below the angles to allow the load flange to rise up to the installed height: 3/8″ max. If the clearance is bigger than 3/8″, shim or grout the constant or pipe attachment accordingly. Re-tighten the 2 travel stop nuts above the angles.
3. Hydro test line if necessary.
4. Loosen and raise up the travel stop nuts above the angles at least a nut thickness to allow the removal of the travel stop rods. Remove the travel stop rods from the load table and store for future use. The constant effort support is now ready for operation.
Type 200 – U (Upthrust) Constants
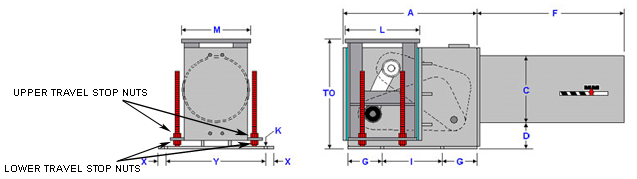
2. Loosen the upper travel stop nuts to allow the load flange to rise up to the installed height: 3/8″ max. If the clearance is bigger than 3/8″, shim or grout the constant or pipe attachment accordingly. Re-tighten the four lower travel stop nuts.
3. Hydro test line if necessary.
4. Back the four lower travel stop nuts all the way down. Back the four upper travel stop nuts all the way up, but do not remove from installation rods. The constant effort support is now ready for operation.
Type G Constant
The Type G constant consists of two Type 100 constants connected by a beam, with the pipe being supported on the beam.
1. Support the pipe at the desired elevation.
2. Attach load rods to the structural support.
3. Attach the constant to the load rods using the turnbuckles provided.
4. Using the turnbuckles, level the pair of channels connecting the two constants.
5. Keeping the channels level, transfer the pipe load to the constant, either by raising the constants or removing any temporary support for the pipe.
6. If hydro testing is required, this should be done now.
7. Remove the travel stops. If they are not in the center of their holes, use the turnbuckles to adjust the load so that the stops are in the center. They should be easily removed. If not, adjust the load until they are.Do not drive them out.
8. Using the turnbuckles, adjust the load indicator to the cold position.
9. After the load reaches normal operating conditions, check to see that the load indicator is at the hot position. If not, adjust with the turnbuckles.
MAINTENANCE INSTRUCTIONS
- Each pipe support should be inspected periodically anywhere from monthly to annually (based on the surrounding environment) to verify load and movement with respect to the design load and travel on the nameplate on the constant frame.
- Clean any and all dust and soot that may gather up in the coil housing especially in dusty environments (desert areas, windy location, and around Coker units).
- Remove any and all foreign objects and debris (bird nest, fallen objects, and pushed aside objects) that may impair spring coil, hanger rod, or load table movement.
- On base type units, ensure the slide plate’s functionality through the absence/removal of dust, soot, and debris on the slide plates that exist between the load flange and the beam/pipe above it.
- No greasing or lubrication is required to any of the constant support parts
Field Instructions for Load Adjustment, Fig. 100 & 200
Under no circumstances should an attempt be made to remove the lock nut and the load adjustment nut from the constant spring hanger.
Every constant spring hanger is calibrated in the factory and set to the load specified on the nameplate. Load adjustment in the field is discouraged as it may significantly change the system.
However, to provide for situations where the supported load is different from the calculated load, the constant spring hangers are equipped with load adjustment capability. The load adjustment capability consists of a load adjustment scale and indicator, which are used to increase (Figure 10A) or decrease (Figure 10C), the load by 10%. Thus, a 2000-pound hanger can be adjusted for loads from 1800 to 2200 pounds. The travel stop pin must be engaged before load adjustment is performed. Adjusting the load to higher or lower load from the load specified on the nameplate using load adjustment is approximate and not recommended.
Figure 10: Field adjustment for load. The Load Adjustment Scale is located on the spring can, near the adjustment nut.
To increase the cold setting be sure that the travel stop pin is in place. Then loosen the lock nut at the end of the spring. Tighten the main nut, then retighten the lock nut.
To decrease the cold setting be sure that the travel stoop pin is in place. Then loosen the lock nut at the end of the spring. Loosen the main nut, then retighten the lock nut.
Constant Hangers with Adjustable Travel Stop Keys: Removal of Travel Stop Key
1. After hanger installation, remove the travel stop hex nuts from both sides. Check whether A-face or B-face of the threaded bolt is in constant with the travel stop keyhole as illustrated in Fig 11, above.
2. If the B-face of threaded bolt is in contact with the travel stop keyhole as shown in Figure 11, turn the turnbuckle clockwise. The travel stop bolt will move towards the center. At this point, the load has been transferred and the constant hanger is balanced with the pipe weight. The travel stop key can be easily removed.
3. If the A-face of threaded bolt is in contact with the travel stop keyhole as shown in Figure 11, turn the turnbuckle counterclockwise. The travel stop bolt will move towards the center. At this point, the load has been transferred and the constant hanger is balanced with the pipe weight. The travel stop key can be easily removed.